Here’s a short experiment ( Not a trick ) to conduct:
“Boosting and Cutting Frequencies to multiple sound elements.”
Whether you’re looking to apply EQ to an instrument or a vocal,
cutting and boosting frequencies should be the main thing youre
thinking about when you want to mold tones of sound.
Heres the main take away from this:
– Cutting Frequencies > Take away from the volume of frequency
– Boosting Frequencies means to give more or Boost the volume of it.
A simple way to view EQ:
Some people disagree and some will agree to the way we will suggest
to look at conducting the expriment.
The reason is as engineers, we need to learn
how molding frequencies work and the actual parameters used
like HZ (Hertz ) for the measure of frequency and DB ( decibel )
for the measure of inputs and outputs of a signal.
But we can look at this not in a different way but in a simpler way.
Here goes: A good way to look at this is to understand hi, middle, and low.
Kinda like Treble, Mids, and Bass on an old school radio.
Let’s look at this example:
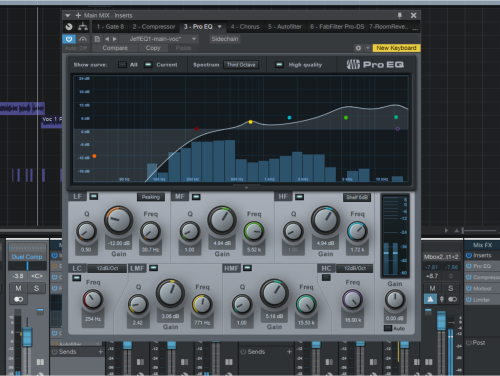
Notice the LF, MF, HF
Low Filter, Mid Filter, High Filter
Let’s start with these.
Well, what is the actual experiment or how is it conducted?
It’s as follows:
Record a voice
Set a sub channel to put effects on
Open an EQ, in our example its the Pre-Sonus EQ pro in Studio One 4.
Go to town editing the EQ for the vocal
And heres the main fun part that will help you understand how your EQ plugin works:
Edit each parameter to the extreme.
